DNS Unlocker has been designated as a potentially unwanted program, but limiting the risk of this infection to this categorization is dangerous. This infection not only spoils your web surfing experience, but it has the potential to expose your computer to more threatening infections. Therefore, if you don’t know how to remove DNS Unlocker from your computer, then keep reading because this guide will give you detailed information about this infection and its removal process.
What is DNS Unlocker?
DNS Unlocker is an adware infection. This application claims that it will give direct access to multiple geo-restricted websites. Users who want to watch streaming services, such as Hulu, BBC iPlayer, Netflix, etc. tend to fall for this marketing strategy and end-up installing this program on their computer. However, later they realize that all their web browsers have been intruded by this app and it’s displaying unwanted ads and pop-up advertisements, each time they visit a website. These ads are displayed as boxes with coupons, pop-up ads, in-text ads and ad banners.
How DNS Unlocker entered your computer?
This application is sometimes installed by the users themselves because they get fooled by the marketing strategy of this adware developers. However, sometimes this adware gets installed without the consent of the users while they are installing some other program on their computer. The technique used for this type of entry is called bundling method. It doesn’t matter which method this adware used to enter your computer, we assure you that you will be able to remove DNS Unlocker from your computer by following the removal instructions given below.
Why DNS Unlocker a threat for computer?
The most obvious reason for removing this adware from your computer are the ads which it displays constantly when you are using your web browsers. However, there is one more important reason. If you don’t remove this adware soon, then it may compromise the data on your computer and use the security loopholes of your computer to facilitate other more dangerous virus infections. Therefore, you must eliminate DNS Unlocker from your computer by using the removal method shared below.
How to prevent entry of DNS Unlocker?
You must take some precautions to prevent the entry of such infections on your computer. Firstly, you should always verify the credibility of a software before installing it on your computer, rather than falling prey to its advertising campaign. Also, while installing a freeware program you should follow the Advanced or Custom installation process so that you can stop the installation of other unwanted apps. Most importantly, always keep a reputed antivirus and an anti-malware program installed on your computer. This security software will detect such infections while they are installed on your computer.
How to Remove DNS Unlocker?
Removing DNS Unlocker adware from your computer is a multiple steps process. First step is to uninstall suspicious programs installed most recently. To do this follow the steps given below.
1. Search ‘add remove’ in the search bar. From results select ‘Add or remove program’.
2. Click on ‘Sort by’ drop-down list and sort by ‘Installation date’.
3. Now select the suspicious program at the top of the list and click ‘Uninstall’ button.
4. Click ‘Uninstall’ to give permission.
5. Click ‘Yes’. Follow the prompts to uninstall the program.
If you find more suspicious programs on the list, then one-by-one uninstall all of them by following the steps mentioned above. After that restart your computer. Then, follow the steps given below.
Remove DNS Unlocker from Internet Explorer (IE)
Remove Doubtful Add-ons:
1. Click ‘Gear’ icon and choose ‘Manage Add-ons’.
2. In Manage Add-ons window, select doubtful add-ons and then click on ‘Disable’.
Change Browser Homepage:
1. Click ‘Gear’ icon and select ‘Internet Options’.
2. In General tab, replace ‘Home page’ with your chosen web address. Click ‘Apply’ and then ‘OK’.
Delete Temporary Files:
1. Go to Internet Options and choose ‘Delete’ under ‘Browsing history’ section.
2. In the Delete Browsing History window, select the necessary fields and click on ‘Delete’.
Reset Browser:
1. Go to Internet Options, choose ‘Advanced’ tab and select ‘Reset’.
2. Choose ‘Delete personal settings’ and select ‘Reset’.
DNS Unlocker adware has been removed from Internet Explorer.
Remove DNS Unlocker from Firefox
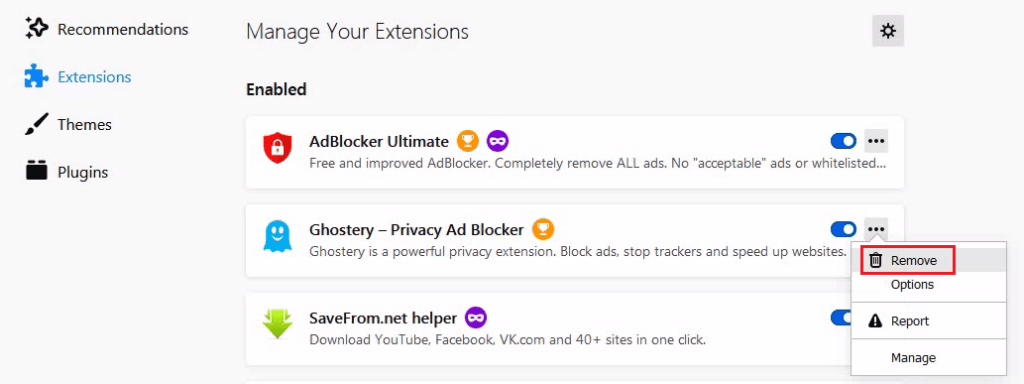
Remove doubtful Extensions:
1. Click ‘Menu’ and choose ‘Add-ons’.
2. Select ‘Extensions’ option and click ‘Remove’ button for all doubtful extensions.
Delete Cookies and Site Data:
1. Open ‘Menu’, choose ‘Options’.
2. Select ‘Privacy & Security’ section. Scroll to find ‘Cookies and Site Data’, then choose ‘Clear Data’.
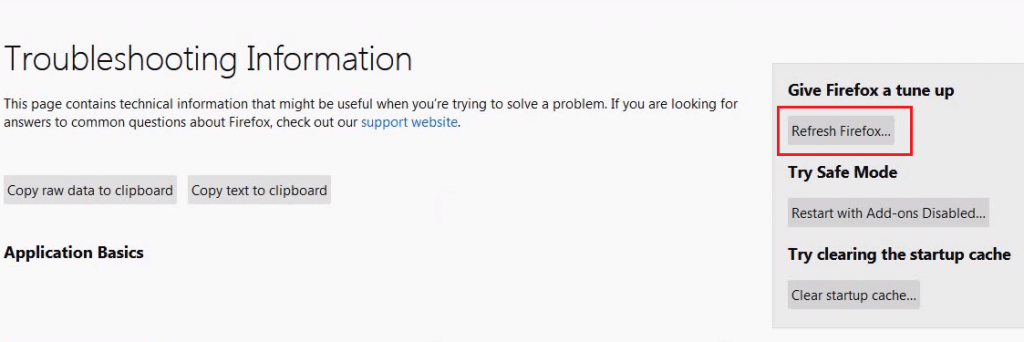
Reset Firefox Browser:
1. Open ‘Menu’ and click on ‘Help’.
2. In Help, choose ‘Troubleshooting Information’.
3. Select ‘Refresh Firefox’ under ‘Give Firefox a tune up’.
4. In the pop-up window choose ‘Refresh Firefox’.
DNS Unlocker adware will be removed from Firefox.
Remove DNS Unlocker from Chrome
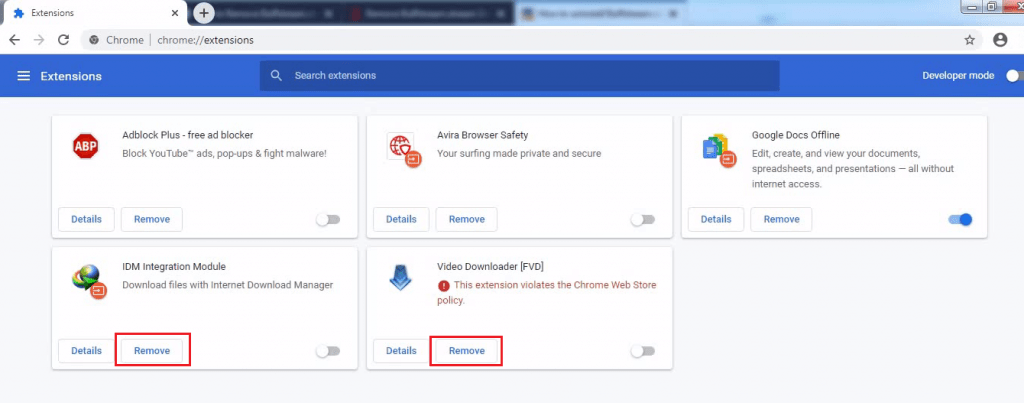
Remove Doubtful Extensions:
1. Click ‘Menu’, select ‘More tools’ and go for ‘Extensions’.
2. You will see the list of Extensions installed in Chrome. Select ‘Remove’ for all the doubtful extensions.
Delete Cache and Web Data from Chrome:
1. In ‘Menu’, select ‘Settings’.
2. Choose ‘Clear browsing data’ under ‘Privacy and security’.
3. Select ‘Browsing history’, ‘Cookies and other site data’ and ‘Cached images and files’. Next, click on ‘Clear Data’.
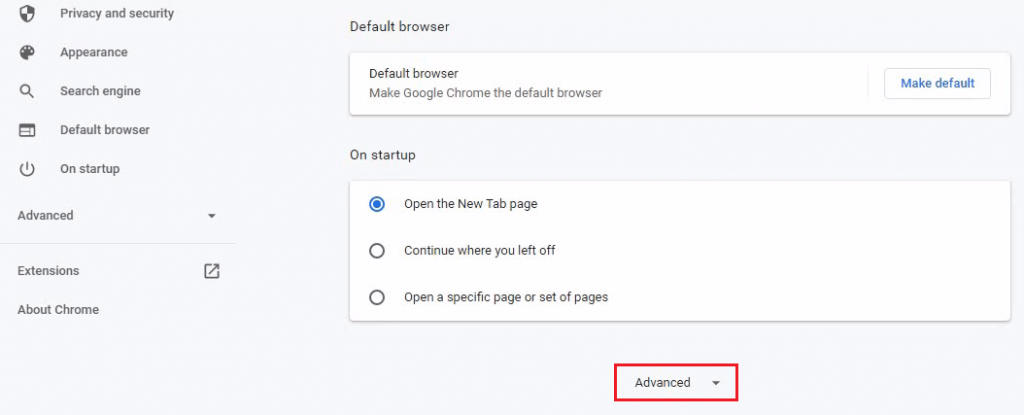
Remove DNS Unlocker Components from Chrome:
1. In ‘Menu’, select ‘Settings’.
2. In Settings, click on ‘Advanced’.
3. Scroll to ‘Reset and clean up’ and choose ‘Restore settings to their original defaults’.
4. Select ‘Reset settings’.
DNS Unlocker adware will be removed from Google Chrome.
In this removal guide, we have provided removal instructions for DNS Unlocker adware. Follow the mentioned removal process in the correct order and don’t skip any steps. If you make any mistake, then you will increase the chances of reappearance of this infection on your computer.


